Nanaimo Bars...luscious no bake cookie bars
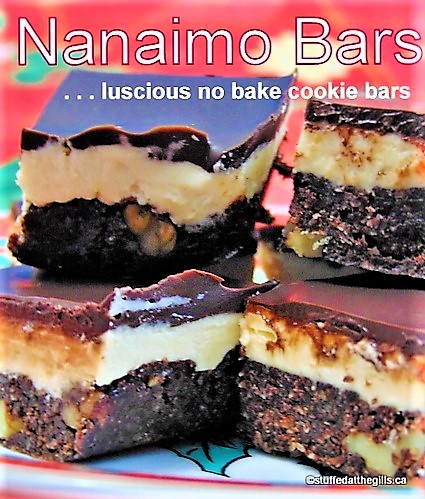
Nanaimo Bars are luscious, no bake bars that are a must on the holiday cookie tray. Layers of chocolate, graham crumbs, nuts, vanilla custard icing and chocolate make these a family favourite.
There must be thousands of recipes for Nanaimo Bars and most of them are basically the same. Mine is really no different than everyone else's but it's the one I make all the time. Not that I make Nanaimo Bars every week. (Heaven forbid! If you think I'm overly rotund now, I'd be positively as big as a barn if I made these every week!)
(Not sure how to pronounce Nanaimo? Click here.)
When you think of a distinctly Canadian cookie/bar/square Nanaimo Bars spring to mind. Although, named after the city of Nanaimo, British Columbia, no one really knows how the recipe came about. There are lots of stories but none of them documented as fact. But, I know where my recipe came from...yes, I do. And, for sure I'm going to tell you. Ha, ha.
I must have been about twelve years old (1964) when I acquired this recipe. Every year our church Dorcas Ladies held a spring and fall variety concert and bake sale to raise funds for their various projects throughout the year. Following the concert everyone proceeded to the bake sale where the ladies of the church proudly showcased the best of their culinary skills. Cakes, pies, loaves and cookies vied with each other for top billing on the loaded tables. This particular year was no different, except up in the corner of the room, one lady had a rather strange display. Instead of wrapping up her cookies in packs of a dozen, as everyone else did, she was selling hers single. That was something new to me. I'd never seen anyone sell one cookie at a time before. And they were cookies I'd never seen before. They were squares with a chocolate top but they weren't brownies. Intrigued, I counted out my money and paid for one of the cookies. I can't remember how much the cookie cost, probably a dime. One bite and I was hooked. It was like nothing I'd ever tasted before. And, thus, began my romance with the lovely Nanaimo Bar. The lady who was selling the Nanaimo Bars was also selling the recipe. I purchased the handwritten recipe for fifty cents! A rather good purchase, wouldn't you say?
That handwritten recipe is long gone but the lingering memory of that first bite remains bright in my mind. I've changed very little over the years. I've doubled the chocolate topping, added vanilla to the filling and omitted most of the salt (the original calls for ½ teaspoon salt!).
Printable recipe at bottom of post.
Note: Custard powder may not be available where you live. You may substitute 2 tablespoons instant vanilla pudding powder in its place.
Nanaimo Bars
Bottom
½ cup butter
¼ cup sugar
5 tablespoons cocoa, sifted
1 teaspoon vanilla
1 egg
2 cups graham wafer crumbs
1 cup unsweetened fine/medium coconut
½ cup walnuts, roughly chopped
Filling
¼ cup butter
3 tablespoon milk
2 cups icing sugar, sifted
2 tablespoon custard powder, sifted with the icing sugar
Pinch salt
½ teaspoon vanilla, optional
Topping
4 ounces (about ⅔ cup, chopped or chocolate chips) semi-sweet or dark chocolate, melted
1 tablespoon butter
Grease and line with parchment paper a 9x9-inch square baking pan. For easy removal let the paper hang over the sides.
For the Bottom: Place butter, sugar, cocoa, vanilla and egg in a medium sized heat-proof bowl. Set the bowl over a pot of simmering water. The bowl should not touch the water. Stir everything together until well combined and the mixture is quite warm. The chocolate mixture should be shiny and almost a custard consistency. Remove from heat and combine with graham wafer crumbs, coconut and nuts. Pack evenly into the prepared pan. Let cool and then spread with the filling.
For the Filling: Beat the filling ingredients together until smooth and thick. Start on low speed if using a mixer or you'll be showered with sugar. The icing mixture should be quite thick but not dry. Spread the filling evenly over the chocolate base and let set 15 minutes.
For the Topping: Melt the chocolate with 1 tablespoon butter. Remember to melt the chocolate over very low heat. Spread the melted chocolate over the filling layer. Chill until chocolate has set.
Cut in squares or bars. To facilitate cutting the bars neatly, dip the knife in hot water and wipe dry between each cut. As these cookies are quite rich and sweet, I find a smaller square to be sufficient. I usually cut them 6x6 for 36 squares or 5x5 for 25 larger squares.
Makes 25-36 squares.
Remember to sift the cocoa. See the lumps of cocoa left in the sifter? They do not dissolve in the mixture.
I used Bird's Custard Powder. Sift it with the icing sugar to remove the lumps from both. If you cannot find custard powder substitute with the same amount of vanilla instant pudding powder.
Make the filling by beating the butter, icing sugar, custard powder, milk and vanilla together. Start on low speed to keep the sugar from flying all over the place. Evenly spread the thick icing over the chocolate base. Let set 15 minutes.
While the filling is setting, melt the chocolate with the butter over low heat. I use a makeshift double boiler. Today I used a very dark chocolate to top my Nanaimo Bars. The filling is very sweet and the dark chocolate balances the sweetness.
Spread the melted chocolate over the vanilla filling.
Chill the bars in the refrigerator until the chocolate is set.
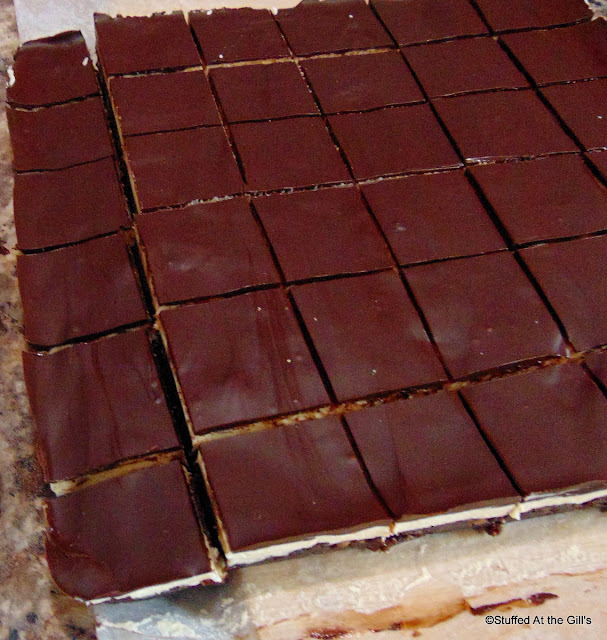
When the chocolate is set cut into squares or bars. To facilitate cutting the bars, dip the knife in hot water, wipe dry and and cut. Do this for every cut. It will take a little longer but the cuts will be neat and the chocolate will not crack.
I cut my bars 6x6 to get 36 squares.
Nanaimo Bars make a welcome addition to any holiday cookie tray.
You will be loved!

Nanaimo Bars. . .luscious no bake cookie bars
Layers of chocolate, graham crumbs, nuts, vanilla custard icing and chocolate make these a family favourite.
Ingredients
- Bottom
- ½ cup butter
- ¼ cup sugar
- 5 tablespoons cocoa, sifted
- 1 teaspoon vanilla
- 1 teaspoon egg
- 2 cups graham wafer crumbs
- 1 cup unsweetened fine/medium coconut
- ½ cup walnuts, roughly chopped
- Filling
- ¼ cup butter
- 3 milk
- 2 cups icing sugar, sifted
- 2 tablespoons custard powder, sifted with the icing sugar
- Pinch salt
- ½ teaspoon vanilla, optional
- Topping
- 4 ounces (about ⅔ cup, chopped or chocolate chips) semi-sweet or dark chocolate, melted
- 1 tablespoon butter
Instructions
Grease and line with parchment paper a 9x9-inch square baking pan. For easy removal let the paper hang over the sides.
For the Bottom: Place butter, sugar, cocoa, vanilla and egg in a medium sized heat-proof bowl. Set the bowl over a pot of simmering water. The bowl should not touch the water. Stir everything together until well combined and the mixture is quite warm. The chocolate mixture should be shiny and almost a custard consistency. Remove from heat and combine with graham wafer crumbs, coconut and nuts. Pack evenly into the prepared pan. Let cool and then spread with the filling.
For the Filling: Beat the filling ingredients together until smooth and thick. Start on low speed, if using a mixer or you'll be showered with sugar. The icing mixture should be quite thick but not dry. Spread the filling evenly over the chocolate base and let set 15 minutes.
For the Topping: Melt the chocolate with 1 tablespoon butter. Remember to melt the chocolate over very low heat. Spread the melted chocolate over the filling layer. Chill until chocolate has set.
Cut in squares or bars. To facilitate cutting the bars neatly, dip the knife in hot water and wipe dry between each cut. As these cookies are quite rich and sweet, I find a smaller square to be sufficient. I usually cut them 6x6 for 36 squares or 5x5 for 25 larger squares.
Note: Custard powder may not be available where you live. You may substitute 2 tablespoons instant vanilla pudding powder in its place.
Details
Prep time: Cook time: Total time: Yield: 25-36 squares


Comments
Post a Comment